Panel Management
Introduction
The Panel Functionality empowers users to send emails or notifications to panellists for diverse objectives, such as inviting them to schedule appointments, directly fill in questionnaires, or deliver general messages. Additionally, within this enhanced functionality, users can efficiently monitor the status of panellists and ascertain their method of test enrollment (source).
Adding Panellists to your Panel
The panellist from your panel database can be
add by clicking the “add panellist” button and selecting the panellists you
would like to involve in your project.
Add existing Panel(s)
In order to load a saved panel click on add
panel, in the panel overview on your distribution page.
You will have the ability to add multiple
panels in one project. There is also a feature in which can set the Maximum
number of panellists. For example, if you have a panel with 1000 panellists,
but only 100 can be invited to the test. Then with the max number of panellists
feature the system will decide which of the 1000 panellists will be included in
your project.
Update existing Panel
When an existing
panel needs to be updated, first load the saved panel and then make the
changes. Adding new panellists, by clicking the “Add Panellists” button and/or deleting
panellists by clicking the “Bin” icon. After the changes have been made, you
can save the panel and update the existing panel.
Import Panellist
This feature enables you to import a list of panellists who do not yet have an account in EyeQuestion. However, you can still track their participation data. To import temporary panellists, you'll need to create an Excel file containing the name and email address of each panellist.
Temporary panellists do not have access to all the functionalities available to regular panellists. For example, they cannot be used for quotas, appointments, or rewards. Also will temporary panellists not be stored in the panel database. Meaning, if you would like to invite the panellists to another project, they will need to be manually added again.
Please note: Temporary Panellists cannot be saved as a Panel
Save as Panel
Within Panel Management, you have the option to save the list of panellists included in your questionnaire as panel. This allows you to easily add them to another project in the future. This feature is particularly useful if you're utilizing quota functionality and wish to create a panel based on a specific quota selections, such as creating a panel for individuals who screened in for the quota "Female 18-24 Chocolate".
Generate Unique Links
With this functionality, you can create an Excel file containing unique links for individual panellists included in your panel. To generate the file accurately, ensure that a list of panellists has been added to your Panel table.
Panellist Status
What sets this feature apart is its ability to filter panellists based on their status, ensuring targeted communication to each panellist's stage in the research steps.
Let's delve into the different statuses and how they align with the panel functionality:
- New: Panellists who have been recently added to the test. No action has been taken by or for the panellist yet.
- Invited: Panellists who have received an invitation email for filling in a test or booking an appointment.
- Reminded: A reminder email is sent.
- In Progress: Panellists who are filling in a questionnaire.
- Completed: Panellists completed a session.
- Screened In, Screener Positive, Screened Out, and Over Quota: Statuses related to functionality used for quota management.
- Planned: Panellists (or User on behalf of a panellist) have booked an appointment.
- Declined: Panellists who were invited to book an appointment but declined the invitation.
- Cancelled: Panellists who have canceled a booked time slot.
- Time Slot Deleted: Occurs when a panel manager deletes a time slot session for which the panellist was planned.
Panel Restriction
Once your panel has been added to a project, panellists can view the project upon logging into their panellist portal. However, other individuals may gain access to the questionnaire through links, QR codes, or by filling out sessions in a sensory booth. Additionally, anonymous panellists may also fill in the questionnaire if they are provided with the anonymous link/QR code.
To ensure that only panellists included in your specific panel are eligible to participate in the questionnaire, you can utilize the locker icon feature. By clicking on the locker icon, only panellists within your designated panel will have access to the questionnaire; the anonymous links will be disabled.
Panellist Source
In this new panel functionality, you can also track the source through which panellists gained access to the questionnaire. Below is a list of different sources available and their corresponding descriptions:
- Via Link: Panellists filled in the questionnaire using the link or QR code shared externally from EyeQuestion and were not in the panel list initially.
- Via Booth Link: Panellists filled in the questionnaire from a sensory booth link and were not in the panel list initially.
- Quota Name + Quota: Panellists filled in a screener and were screened in for joining this study. This functionality works if within the quota set up in the screener, the options for screening in are either plan appointment for a linked project, continue with a linked project, or add the panellist to a linked project.
- Panel's Name + Panel: Panellists were added by a user who included a list of panellists from either a static or dynamic panel.
- Manually Added: Panellists were added manually by a user by selecting the "Add panellist" button.
Contacting panellists in EyeQuestion can be done through email or by sending notifications via the EQAPP.
Contacting Panellists via Email
Contact Settings
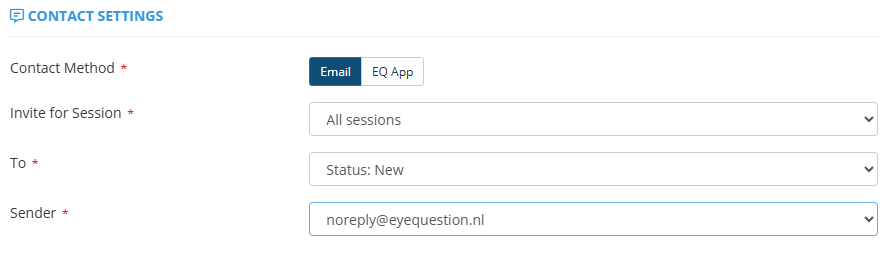
- Invite for Session: When opting for email as the contact method, you have the flexibility to select which session to send the project to. This feature is particularly useful when you need to send the project directly to panellists, and they are required to fill only one session from your questionnaire.
- To: You can specify the recipients of the email by either selecting panellists from the Panel table or by choosing the status that panellists must have to receive the email. For instance, if you're planning an upcoming study, you can schedule emails well in advance and utilize the "To:" setting along with panellist statuses to target recipients based on their status changes throughout the study. For example, you can schedule an email for panellists with the "New" status to invite them to complete the questionnaire, and another for those with the "Completed" status to thank them for their participation.
- Sender: This option lets you decide whether to send an email to the panellist using the system's default sender email address or to use your own email address instead.
To enable the option of sending emails using your own email address, please contact us via support@eyequestion.nl for implementation assistance.
Message Content
In this section, you can compose the subject and body of the email to be sent to panellists. EyeQuestion provides smart template selection based on your questionnaire settings. For instance, if appointments are enabled, the template for inviting panellists to book an appointment will be displayed. If not, templates for inviting panellists to fill in the questionnaire will be shown.
Clicking on the flag icon allows for automatic translation of each template. While you have the freedom to customize the text and layout within each template, it's crucial to include the following placeholders when inviting panellists for a test or booking an appointment:
For sending the project link: $$user:autolink$$
For booking an appointment: $$pm:portalLink$$
Scheduling Settings
You can send an email instantly via EyeQuestion by simply clicking "Send," or you have the option to schedule it for a future date. This feature is particularly useful for organizing your studies in advance. Even if you won't have access to EyeQuestion on the day of your study, you can still plan and schedule the email ahead of time. Additionally, within these settings, you can specify the time zone for sending the email, enabling you to send different emails tailored to different time zones.
Sent and Schedule
You can review all emails that have been sent and scheduled on the Send and Schedule page. If an email is still scheduled, you're free to modify its text and the time it's sent. Once an email has been sent, you can see the text that was sent to panellists and the date/time it was sent.
Note: Temporary panellists are not displayed in the send and schedule section. If you're scheduling based on panellist status, you won't see the list of panellists that were contacted.
Contact Panellists via EQAPP
This feature allows you to send notifications to specific panellists using EQAPP. Here, you can customize the content of the notification, choose when it will be sent, and specify the duration during which panellists can fill out questionnaires or schedule appointments via EQAPP.
Related Articles
Panel Restriction
Introduction Panel Restrictions allow you to filter out panellists based on their past or future appointments or their participation in specific projects. This feature helps you create more targeted panels by excluding panellists who may not be ...How to Create and Configure a New Panel
Panels are groups of panellists that can be assigned to projects. You can build a panel by combining category filters, panellist characteristics (such as age or gender), and project participation restrictions. This article walks through the full ...Panel Scheduling in EyeQuestion 5
Introduction One of the more challenging tasks in conducting sensory and consumer research is the process of manually checking the availability of your panellists participation by calling or emailing them. This traditional approach is not ideal as it ...Appointment Scheduling
Introduction Whether you're conducting a sensory test or a home use test (HUT) study, efficient appointment scheduling is crucial. It ensures that participants are available at the designated time, maximizing the effectiveness of your research ...How to Automatically Sync Panellists Across Projects
Introduction Sometimes a project is used to invite panellists to book appointments, while the same panellists also need to appear in other related projects. Normally, panel managers must add or remove panellists manually in each project. The Sync ...